
Creating Legs Using The Shipment Splitter
How to reshape a shipment's journey in the Splitter: splitting at a hub, parallel lanes, putting legs on tours, staging and applying a plan, and the warnings you can accept.
How to reshape a shipment's journey in the Splitter: splitting at a hub, parallel lanes, putting legs on tours, staging and applying a plan, and the warnings you can accept.
Was this article helpful?
Did not find your answer?
Ask Luna, or write to our support team.
Note
The Shipment Splitter is where you decide how a shipment is carried: straight through, through a hub, or across several vehicles. You stage the whole plan, review it, and apply it in one step.
A shipment states what has to happen. The Splitter is where you work out how. In it you reshape a shipment's legs: dividing a journey at a hub, moving part of the cargo onto a second vehicle, joining stages back together, and putting each stage onto a tour.
One thing is worth knowing before you start. In the Splitter you are editing a plan, not the shipment. Nothing you do reaches the shipment until you apply it, and until then you can step back through your changes or return to where you started. See the Legs article for what a leg is and how legs make up a journey.
Key highlights
You reach the Splitter from a shipment, either on its detail page or from a shipment list. On a shipment that has never been carried in stages the action reads Split Shipment into Legs; once it has, the same action reads Edit Legs. You can also open it from a single leg, either in the shipment's Legs section or on the leg's own page, where the action reads Edit Leg and opens the same window with that leg already selected.
The Splitter opens as its own window, which you can move and resize, so you can keep working elsewhere in Orbit MissionControl while it is open. Opening it again for the same shipment brings that window to the front rather than starting a second one.
The action is available only while at least one leg can still be edited, and you need permission to update shipments and to read legs.
The map fills the window. It draws each leg of the shipment, the routes of the tours you could use, and a pin for every cross-dock hub available to you.
The shipment summary gives you the fixed facts: how many loads there are, their total weight, the delivery window, and the shipment's own pickup and dropoff. These do not change, whatever you do to the legs.
The Legs panel lists the legs in the order they are travelled, with parallel legs shown alongside each other. Each row carries the leg's status and the tour assigned to it, if any. Right-clicking a leg opens the menu of things you can do to it.
The Tour Candidates panel shows the tours that could carry the leg you have selected. It follows your selection, so until you click a leg it simply invites you to pick one.
A bar along the bottom carries undo and redo, Reset, a count of the tours your changes would affect, and Apply. Nothing you do reaches the shipment until you apply.
Everything you can do to a leg is in one place. Right-click a leg, either its row in the Legs panel or its line on the map, and the menu lists the actions available to it. The menu is honest about what is possible: an action that would not work on that leg is either absent or shown greyed with the reason, so you are never left guessing why nothing happened.
| What you want to do | Menu entry |
|---|---|
| Break a journey at a hub | Split at Hub |
| Move part of the cargo onto a second vehicle | Split Loads onto Parallel Lane |
| Join a leg to the one after it | Merge with Next Leg |
| Join two parallel legs back into one | Merge with Lane |
| Put a leg on an existing tour | Assign to Tour |
| Take a leg off its tour | Remove Tour Assignment |
| Start a new tour for a leg | Route Leg onto New Tour |
Where two legs run in parallel, the merge entry names the lane you would be merging with, so you can tell them apart.
Two of these are also gestures. You can split at a hub by dragging a leg onto the hub's pin, and put a leg on a tour by dragging it onto that tour. Everything else is done from the menu.
Merging is the reverse of splitting, and is offered when two legs genuinely belong together: one ending where the next begins and carrying the same loads, or two parallel legs running between the same two addresses.
Taking a leg off its tour, or splitting a leg that was already on one, leaves that tour without the work it was carrying. You do not have to tidy up after it. When you apply, Orbit rebuilds the tour around whatever remains on it, and cancels it outright if it is left carrying nothing at all.
Three of these deserve a closer look.
Splitting at a hub replaces one leg with two, meeting at the hub you choose, both waiting to be routed.
The hubs on offer are your organisation's own locations that are marked as cross-dock. If none have been set up, the menu tells you there are no cross-dock addresses available, and no pins appear on the map. Setting them up is covered in the Global Addresses & Cross-Dock Hubs article.
Where you have many, the menu includes a search, and each hub is listed with the rough extra distance splitting there would add, so you can weigh a convenient hub against a costly detour.
When cargo will not fit on a single vehicle, you can move some of it onto a parallel lane: a second leg running between the same two addresses, carrying the loads you moved. Both legs then sit at the same point in the journey, and you route each one separately.
You move whole loads. At least one load must stay on the original leg, and you cannot divide a single load between two lanes, so eight pallets recorded as one load travel together. If you need them to travel separately, they need to be separate loads on the shipment.
Choose Assign to Tour in the menu and pick a tour, press Assign on a candidate, or drag the leg onto a tour. Each of these opens the Assign Leg window, which previews what the assignment does to that tour: its stop sequence with the time windows, the detour, any waiting time, and how full the vehicle will be. There are two ways to put a leg on a tour, and the difference is in what moves.
Whole Leg onto the Tour keeps the leg exactly as it is. The tour takes on the leg's pickup and dropoff as new stops, which means the tour is extended to reach them. The window shows how many stops, minutes and kilometres that adds. Use this when you are happy for the tour to be reshaped around the work.
Split Leg: Section onto the Tour keeps the tour as it is instead. The tour carries only a section of the journey between its own existing stops, and Orbit creates up to two further open legs for the pre-carriage and post-carriage: the run from the original pickup to where the tour takes the cargo on, and from where the tour sets it down to the original dropoff. The window names the section (first, middle or last) and the length of each open leg. Those legs arrive unrouted, for you to plan separately. Use this when the tour is a fixed line-haul you do not want to divert. The option appears only for a tour that can take a section; such tours are also listed under Network Suggestions in the Tour Candidates panel, where Assign Section opens the same window in that mode.
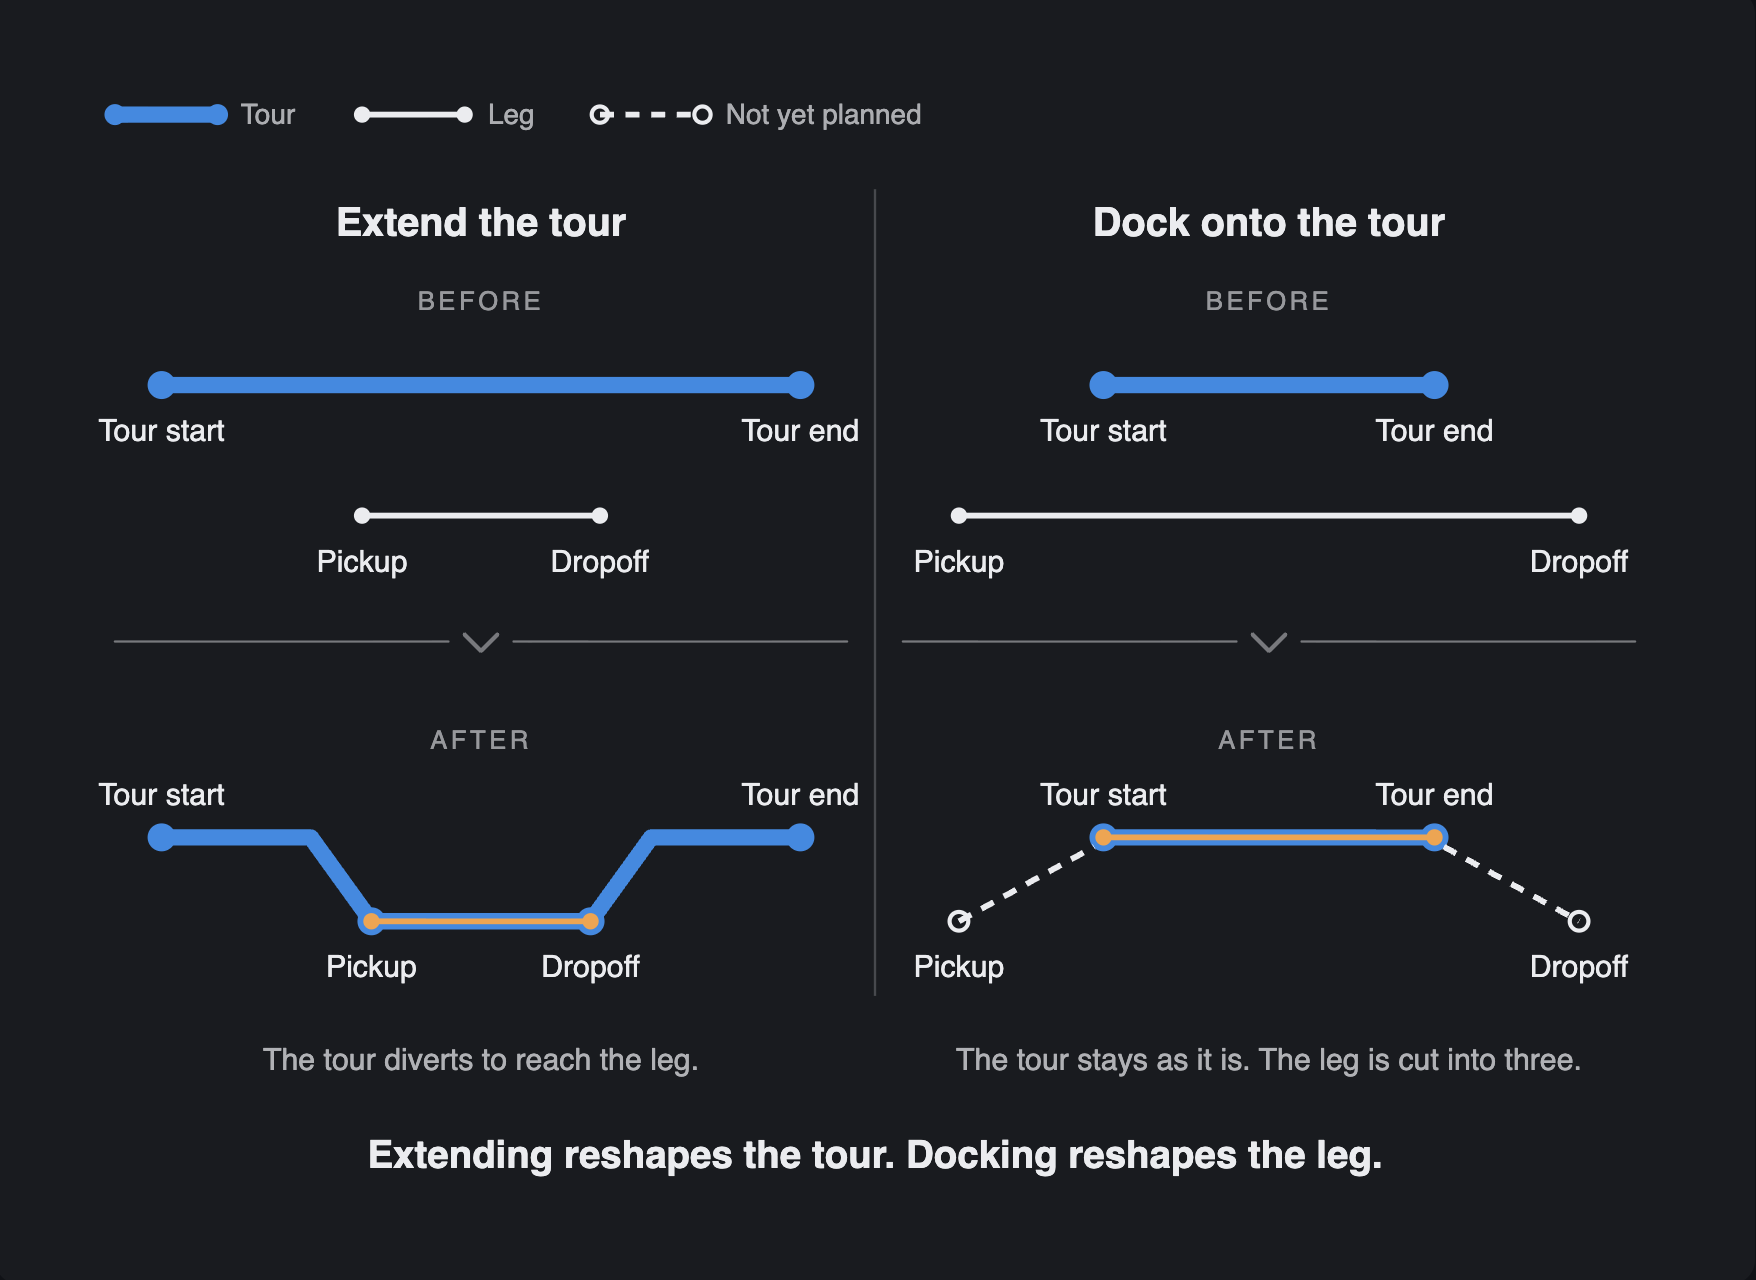
Where the tour already stops at both of the leg's addresses, nothing is extended: the window offers a single Route onto Tour action marked Exact Match, and the tour's route and stops stay unchanged.
Splitting at a hub and putting a leg on a tour are often quicker done by hand on the map. Pick up a leg by its handle on the map, or by its row in the Legs panel, and drop it on a hub pin or on one of the tours offered for it.
Dropping on a hub splits the leg there straight away. Dropping on a tour opens the Assign Leg window, where you confirm the assignment and, where the tour could take a section of the leg, choose between the two options. If several targets sit under the pointer, Orbit lists them and lets you choose rather than guessing.
The Tour Candidates panel does the searching for you. Candidates are grouped by how well they fit: those that fit, those that fit with caveats such as a tight connection or a nearly full vehicle, and those that do not fit. Within each group they are ordered by how much time the detour adds, so the cheapest option to run is at the top.
One cause of caveats is worth recognising, because it is the commonest. When you are choosing a tour for a leg whose earlier leg has not been planned yet, Orbit has no settled time for when the cargo will reach the transfer point, so the connection rests on an assumption. Rather than present that as a clean fit, it ranks the tour with caveats. Planning the earlier leg first settles the question.
A tour that cannot take the load is still listed, marked Over Capacity. This is deliberate: knowing why a tour is unsuitable is more useful than not seeing it at all. Capacity here is a real load-plan check of whether the cargo fits alongside what the tour already carries, not a comparison of weights. When Orbit cannot work it out, it says so rather than guessing.
A tour you have already used elsewhere in the plan you are staging shows as Assigned in Draft, and cannot be chosen twice: a shipment puts at most one of its legs on any one tour.
The panel shows the best handful of options rather than every tour you run, so a tour you had in mind may simply have ranked below them.
An empty panel usually has a plain explanation:
If nothing suitable exists, you do not have to wait for one. Leave the leg unrouted and plan it later, or start a new tour for it.
Everything you do is held in the Splitter until you apply it. Undo steps back through your changes, redo puts them back, and Reset returns you to the plan as it was saved.
When you are ready, Apply opens a review of what you are about to do. It shows the legs that will be created, the legs that will change, and each affected tour with the legs it gains and loses, along with an estimate of how many stops it will have afterwards. Any warnings appear here too. Nothing is committed until you confirm from that review, and confirming while a warning is on screen is how you accept it.
Once applied, the plan takes effect on the shipment and the Splitter closes.
| Warning | What it means |
|---|---|
| Tour May Be Over Capacity | The loads do not fit the vehicle alongside what the tour already carries. |
| Time Windows May Not Fit | The leg wants a time that does not overlap when the tour runs. |
| Tour Schedule May Slip | A later stop on the tour, possibly belonging to another shipment, may miss its own time window. |
| Connection May Be Missed | The rest of the journey can no longer reach the final delivery on time. |
None of these stop you. They are judgements about how comfortably a plan will run, and you are better placed to make the call than Orbit is, so you can apply the split anyway.
If the check itself cannot be carried out, Orbit tells you that instead of reporting no warnings, and you can still apply.
Occasionally a plan changes between your review and your confirmation, because someone else has been working at the same time. When that happens Orbit does not quietly apply a plan you have not seen: it stops and asks you to reopen the review and look again.
Some things are refused outright, with no way to override them, because they are not judgement calls:
A shipment can also have at most ten legs. Once you reach that, the options that would add another are shown but unavailable.
The Splitter works on one shipment at a time. There is no way to select several shipments and route them all through the same hub in one action: each is opened, planned and applied on its own. Where you do want to work on many at once, plan the legs themselves from the Legs list, which is described in the Legs article.
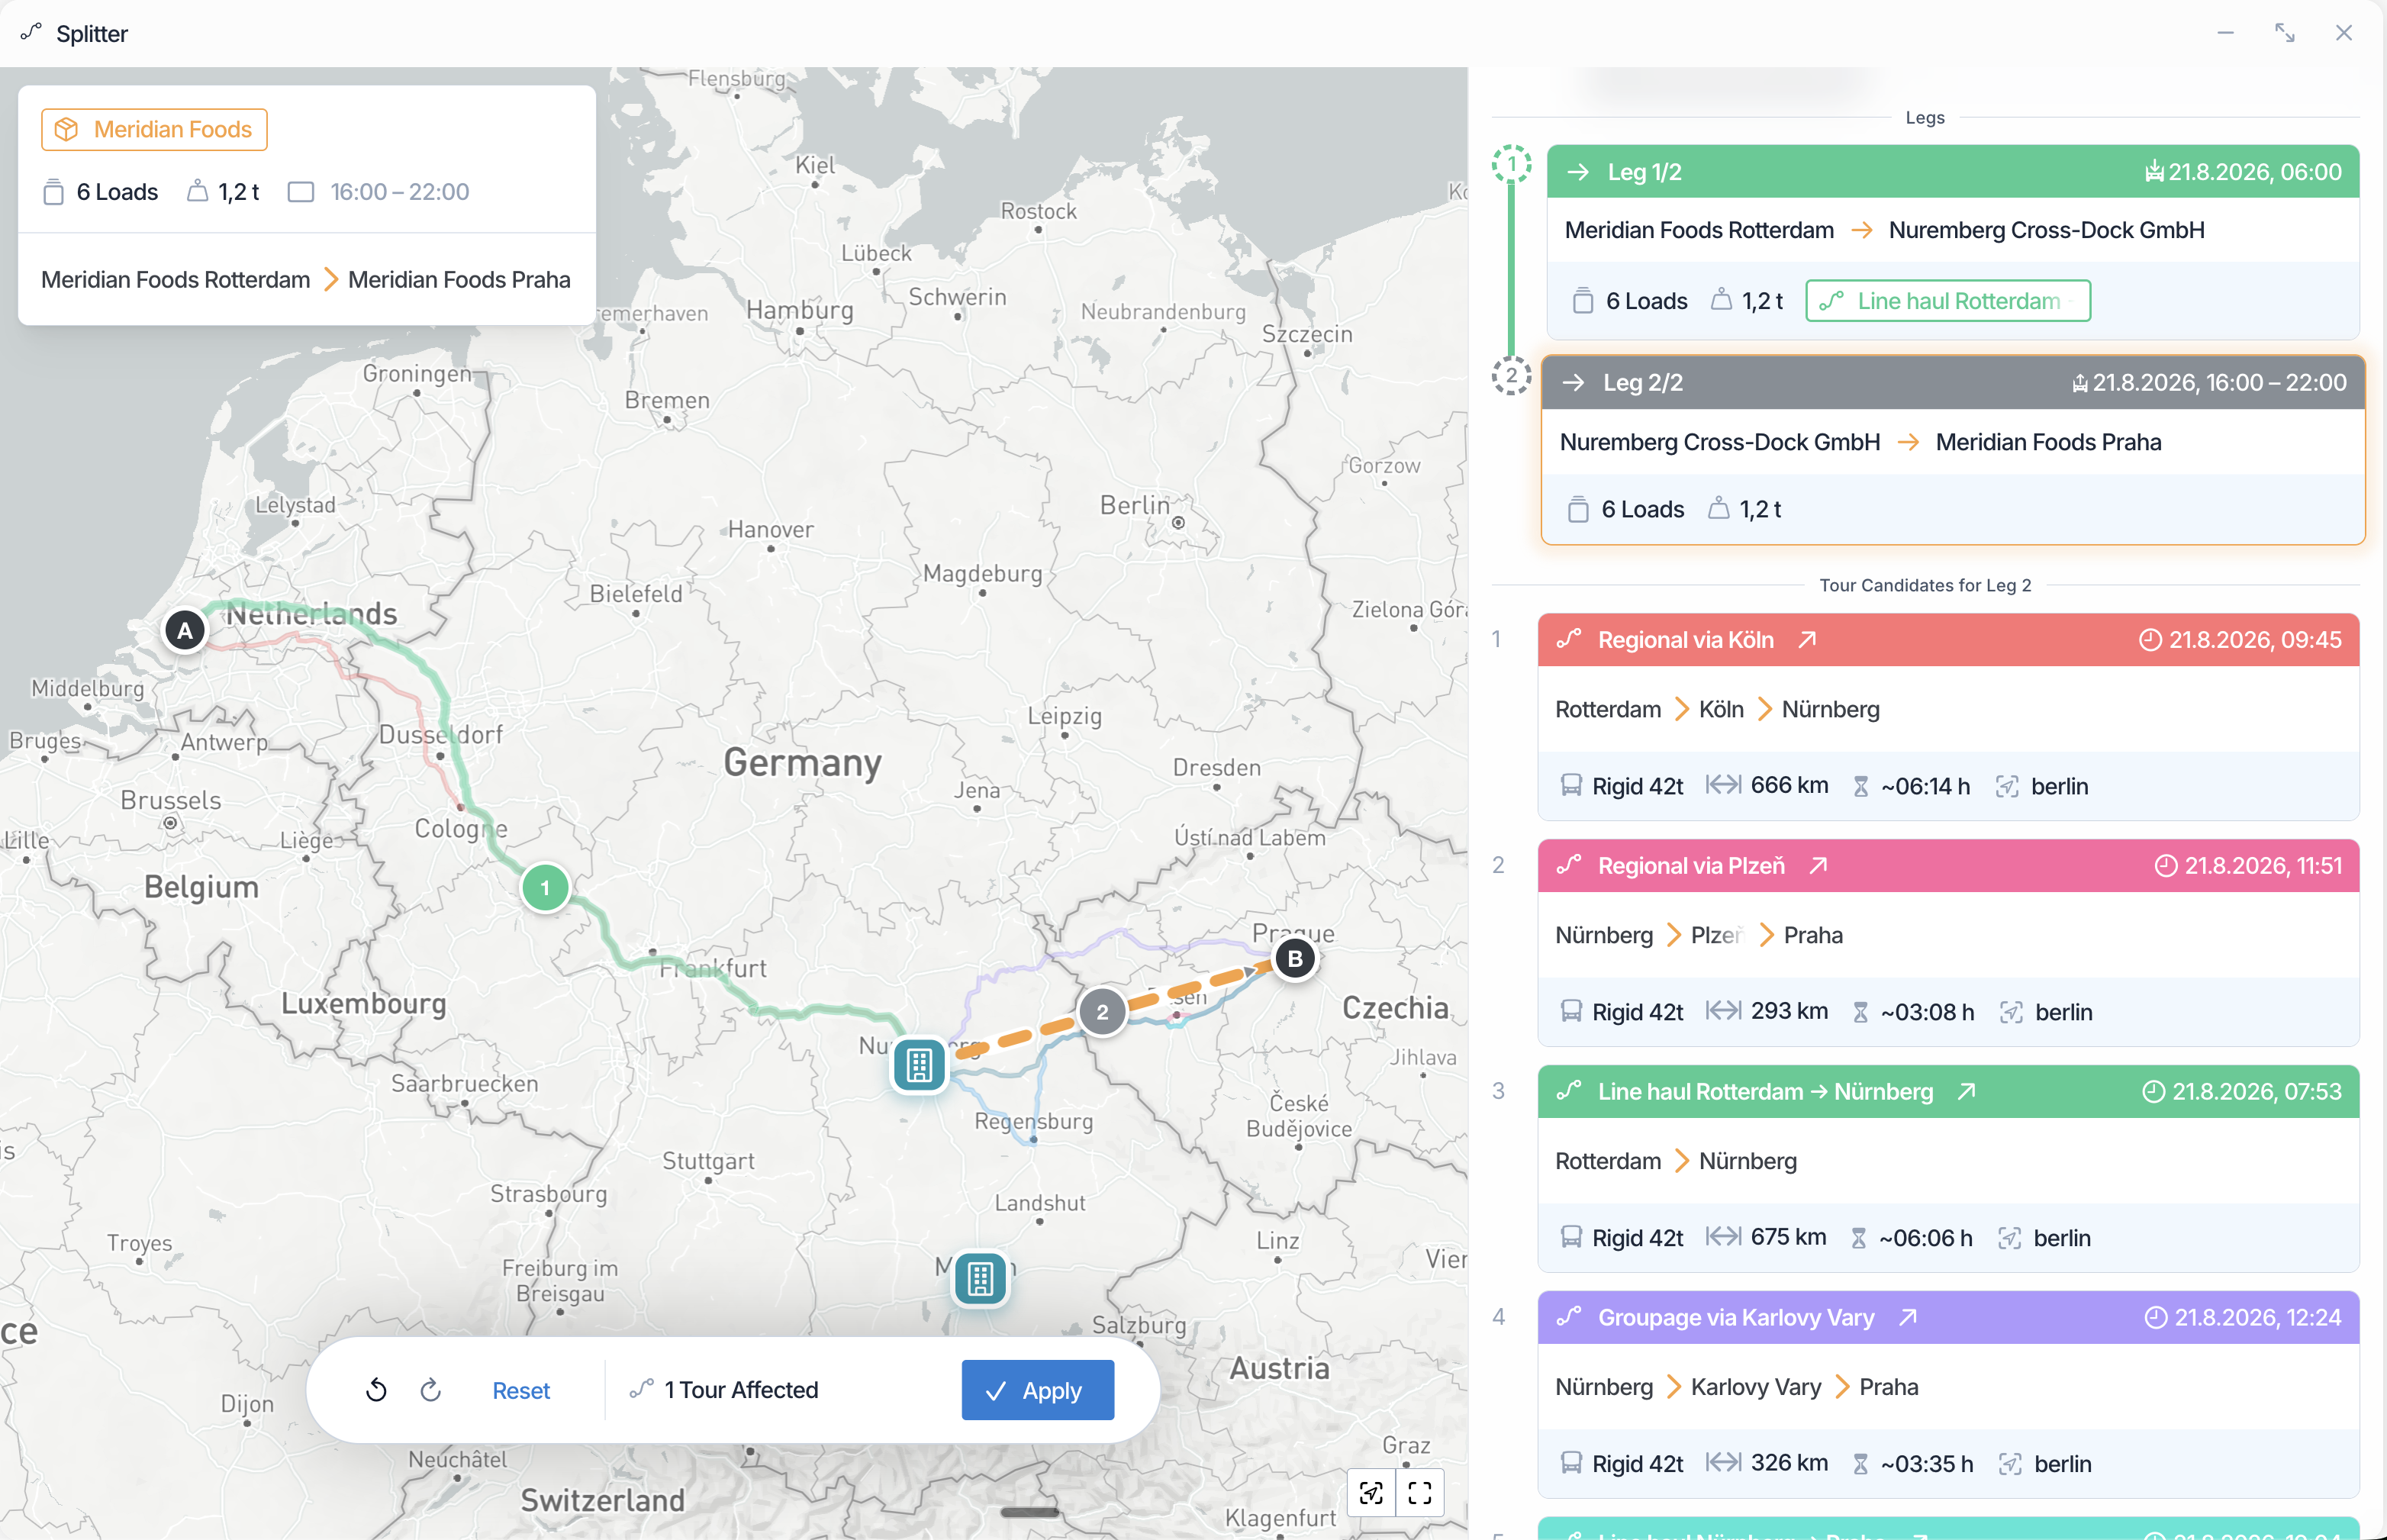
Meridian Foods books six pallets from Rotterdam to Praha, and no single vehicle is going the whole way. Julia opens the Splitter on the shipment and drags the leg onto the cross-dock pin at Nürnberg, which gives her two legs: Rotterdam to Nürnberg, and Nürnberg to Praha. She selects the first and assigns it to a line-haul tour that already runs that lane. She then selects the second, and the candidates panel offers the tours that could carry it onward: a direct run to Praha, and regional tours that would get there by way of Plzeň or Karlovy Vary. Nothing has reached the shipment yet, so she reviews the two legs and the tour they affect, and applies (see the screenshot above showcasing exactly this situation).
No. Everything you do in the Splitter is held until you apply it. Until then the shipment is untouched, and Reset returns you to the saved plan.
Because it has already started or has finished. The Splitter only reshapes the part of a journey still ahead, so legs under way have no handle and no menu.
Whole Leg extends the tour to the leg's own pickup and dropoff. Split Leg leaves the tour as it is, gives it only a section of the journey, and creates separate open legs for the runs at either end.
No. The Splitter works on one shipment at a time. To act on many legs together, use the Legs list, where you can select several and route them onto a tour in one step.
Because it cannot take the cargo, or because you have already used it for another leg of the same shipment. It stays visible so you can see why it is not an option.
The plan's capacity or timing changed between your review and your confirmation, usually because someone else was working on the same tours. Reopen the review to see the current position and confirm again.
No. Lanes carry whole loads, so a load recorded as one unit travels as one unit. If parts of it need to travel separately, record them as separate loads on the shipment.
Recovery happens outside the Splitter, on the leg itself. See the When a Delivery Fails article.